Install B182 Huawei P9 Android 6.0 OTA [Europe] [LEAK]
Install B182 Huawei P9 Android 6.0 OTA [Europe] [LEAK]
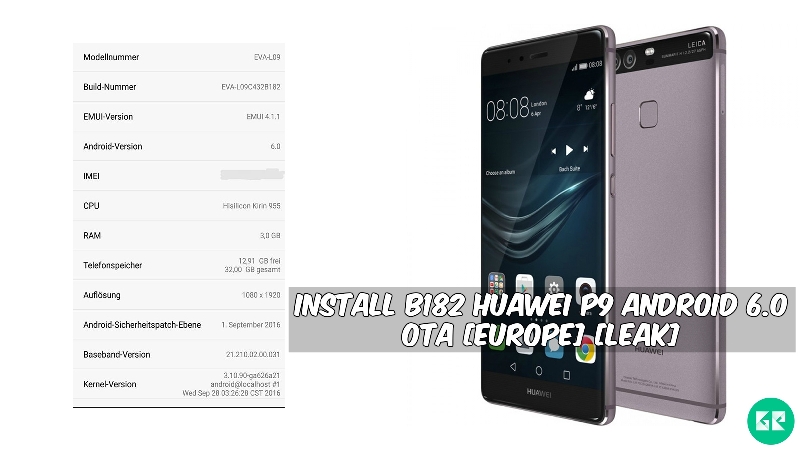
Some day ago Huawei launched Huawei p9.The Huawei p9 is run 1.8GHz octa-core HiSilicon Kirin 955 processor and it comes with 3GB of RAM. Internal storage is 32GB that can be expanded up to 256gb via a MicroSD. It has 5.2 IPS LCD capacitive touchscreen, 16m colors , with a resolution of 1080 x 1920 pixels . This device lets you snap brilliant 12-megapixel photos and 8-megapixel. It measures 145.00 x 70.90 x 6.95 (height x width x thickness) and weighs 144.00 grams. It has a non-removable 3000mAh battery.
Before some day Huawei_p9 received B182 OTA update that based on latest emui 4.1.1 version interfaces. That’s why many users Asking for how to update B182 Huawei P9 Android 6.0 OTA for Manually Flash. We Already share the downloaded link below The Huawei_P9 B182 OTA Zip. Here The Guide And B182 OTA Firmware Link. So don’t wait just go below and follow the guide, …
Firmware Details :-
- Android Version :- Marshmallow v6.0
- UI Version :- Emotion UI 4.1.1
- Firmware Versions :- B182
- Huawei P9 :- EVA-L09
- Release Date :- 28.oct.2016
- Firmware :- EVA-L09C432B182
- Status :- Official
- Region :- Europe
- Size :- 1.53 GB
Note :-
- This Firmware Work Only Huawei P9 Europe variant devices That be Already Running A C432 Based Firmware.
You may also like :-
B180 Huawei P9 Android 6.0 OTA
Huawei P9 Android 7.0 Nougat Beta OTA
Huawei P9 fRomFuture Custom ROM
Preparation :-
- Backup all phone data and important things.
- Your device at least needs To 60% charge for flashing.
⇓⇓ Download B182 For Huawei P9 ⇓⇓
Guide To Install Firmware :-
- Force Update Method:-
- Create A Full Backup Of Your Phone.
- Download OTA Zip File & Extract It.
- Copy dload Folder To Root Of The Sdcard.
- Switch Off Your Phone & Hold The “Volume Up + Volume Down + Power Button“.
- Automatic Phone Detect Update File & Flashing Will Start.
- After Flashing Done Your Phone Automatic Reboot & Enjoy Android Marshmallow.
- Normal Method:-
- Download OTA Zip File & Extract It.
- Copy dload Folder To Root Of The Sdcard.
- Open Dial Pad Type “ *#*# 2846579#*# * ”
- Select Software Upgrade > SDCard Upgrade -> confirm the installation.
- Flashing Will Start. After Flashing Done Your Phone Automatic Reboot.
Note:- Fast Time It’s Takes 8-12 Minutes To Boot.